Cornrows for kids are far more than a fashionable protective style. For parents juggling school runs, sports practices, and bath time, they represent a strategic solution to daily hair management. When installed correctly, cornrows can last two to three weeks, significantly reducing morning stress while promoting healthy hair growth by minimizing breakage and tangling.
However, not all cornrow styles are created equal for children. Young scalps are more sensitive than adults’, and their hair textures range from fine and delicate to thick and coily. The key is selecting patterns that distribute tension evenly—never pulling too tight at the hairline—while incorporating creative elements that make your child excited to sit in the chair.
This guide presents 18 carefully curated cornrow hairstyles specifically designed for kids. You’ll find options for every occasion, from classroom-appropriate simple straightbacks to birthday-party-ready heart patterns and feed-in braids with colorful beads. Each style includes an honest assessment of maintenance level, estimated styling time, and best-suited hair textures.
also check this 10 Timeless and Practical Middle Part Hairstyles for Kids.
Beyond the styles themselves, we’ll cover critical topics most blogs ignore: how to properly prep your child’s hair before braiding (including the best detangling conditioners and stretching methods), a weekly maintenance routine that preserves the style without product buildup, and five common mistakes that cause breakage. By the end, you’ll have everything you need to make cornrows your go-to protective style for the school year.
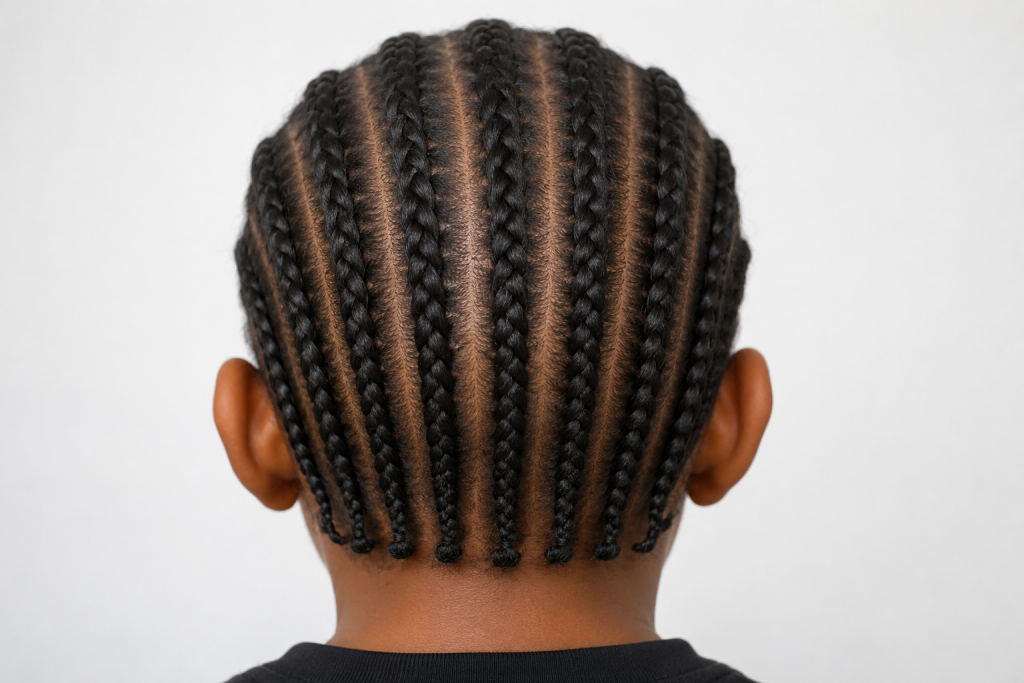
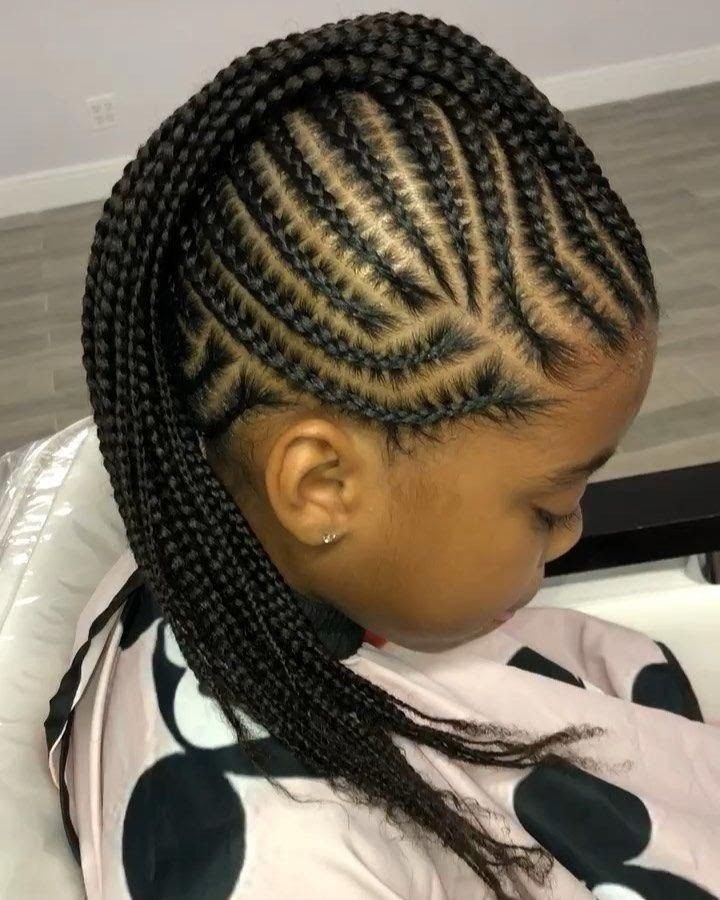
1. Classic Straight-Back Cornrows
The foundational style every parent should master. These run directly from the hairline to the nape in uniform rows, typically 6 to 10 individual plaits depending on hair density. For children with fine hair, narrower rows (¼ inch) create the illusion of fullness. The beauty lies in simplicity—no complex parting required, making installation take only 45 to 60 minutes. To reduce tension on the edges, start each row with a small “base braid” of natural hair before incorporating added extensions. Straight-backs excel for active kids because there are no loose ends to snag on backpack straps or car seat buckles. Refresh daily by spraying with a water-aloe vera mix and applying lightweight oil to the scalp every three days.
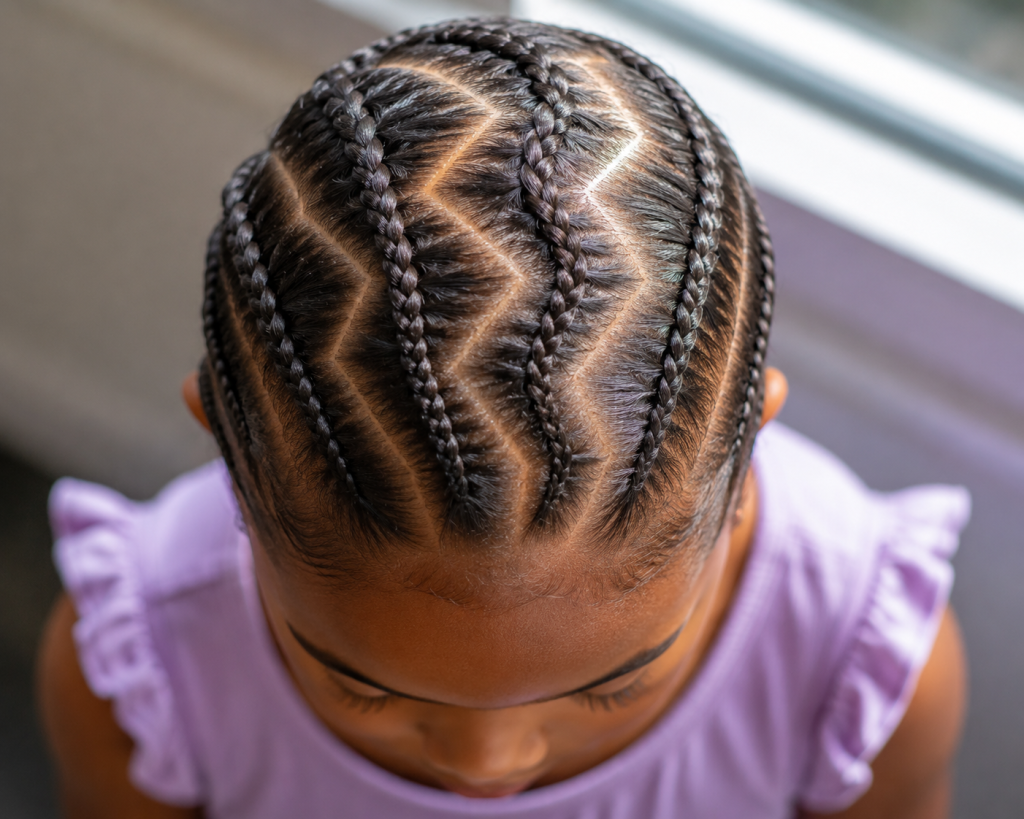
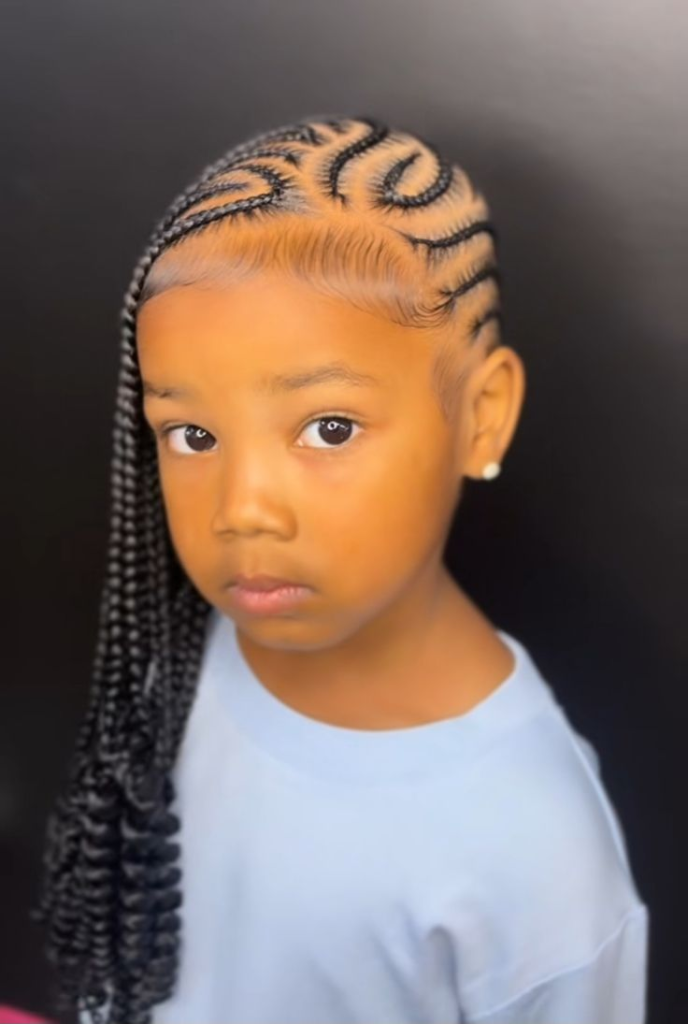
2. Zig-Zag Part Cornrows
Replace straight part lines with gentle zigzags to add visual interest without increasing complexity. Use a rat-tail comb to map the pattern from forehead to crown before braiding. The zigzags should be wide (at least one inch between points) to prevent sections from merging. This style cleverly camouflages new growth, extending the style’s wearable life by three to four days compared to straight parts. It’s particularly flattering for round face shapes as the angles create structure. To maintain crisp lines, avoid washing until day five—use a foam mousse on a soft toothbrush to clean parts instead. Pair with colorful thread wrapped around the last inch of each braid for a playful finish.
3. Cornrows into Pigtails
The ultimate school-day hybrid. Braid the top half of the head in four to six straight cornrows ending at the crown, then gather the loose ends into two high pigtails. This reduces tension on the hairline since only half the head is braided. The pigtails can be left loose, twisted into buns, or braided into two-strand twists. For fine hair, add kanekalon hair only in the cornrowed section to prevent the pigtails from appearing stringy. Children love the versatility—pigtails can be worn up for sports or down for pictures. Re-moisturize the ends nightly with leave-in conditioner, and re-braid the pigtails every five days to prevent matting at the nape.
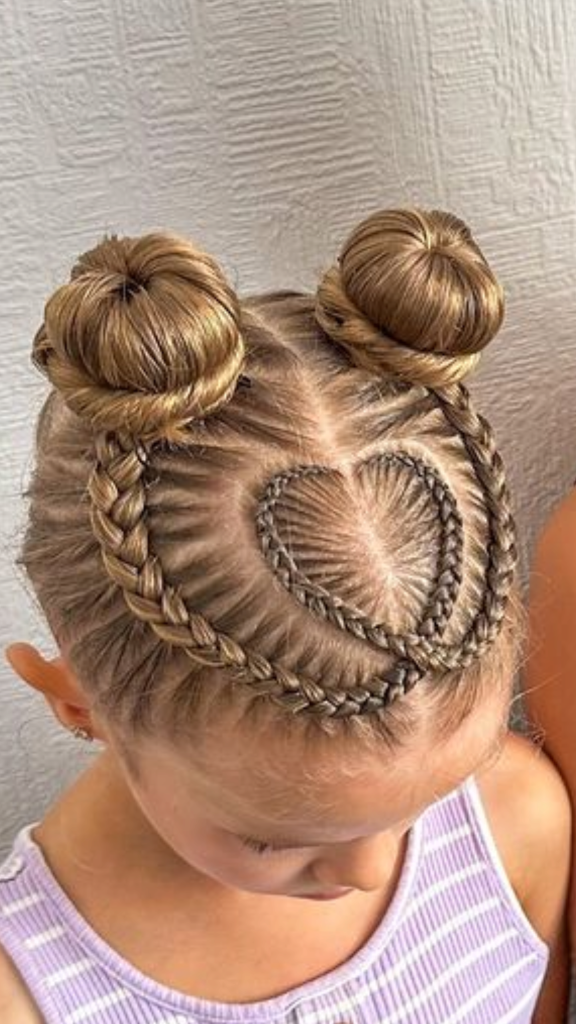
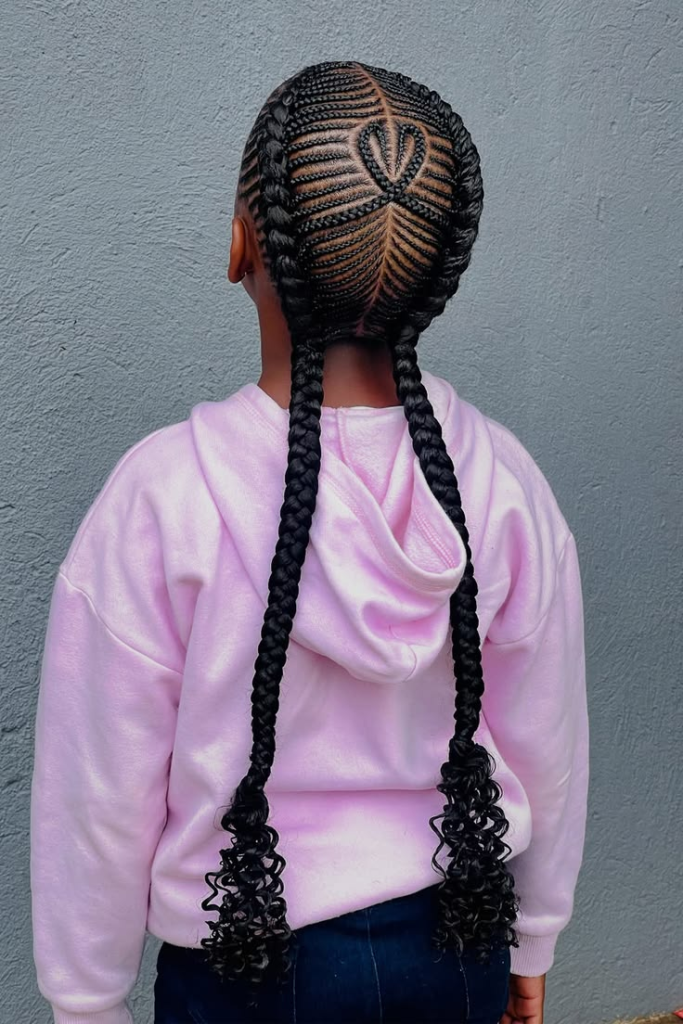
4. Heart-Shaped Cornrows
Perfect for birthday parties or Valentine’s week. Create a heart outline at the crown using three curved cornrows that meet at the bottom point, then fill the center with straight rows radiating outward. For beginners, draw the heart with a white eyeliner pencil first. This style requires medium-density hair—too thin and the heart lacks definition, too thick and the curves become bulky. Installation takes 90 minutes but the “wow factor” lasts a full week. To preserve the shape, have your child sleep on a satin pillowcase and avoid ponytails that would distort the pattern. Spritz with rose water daily for scent and light hold.
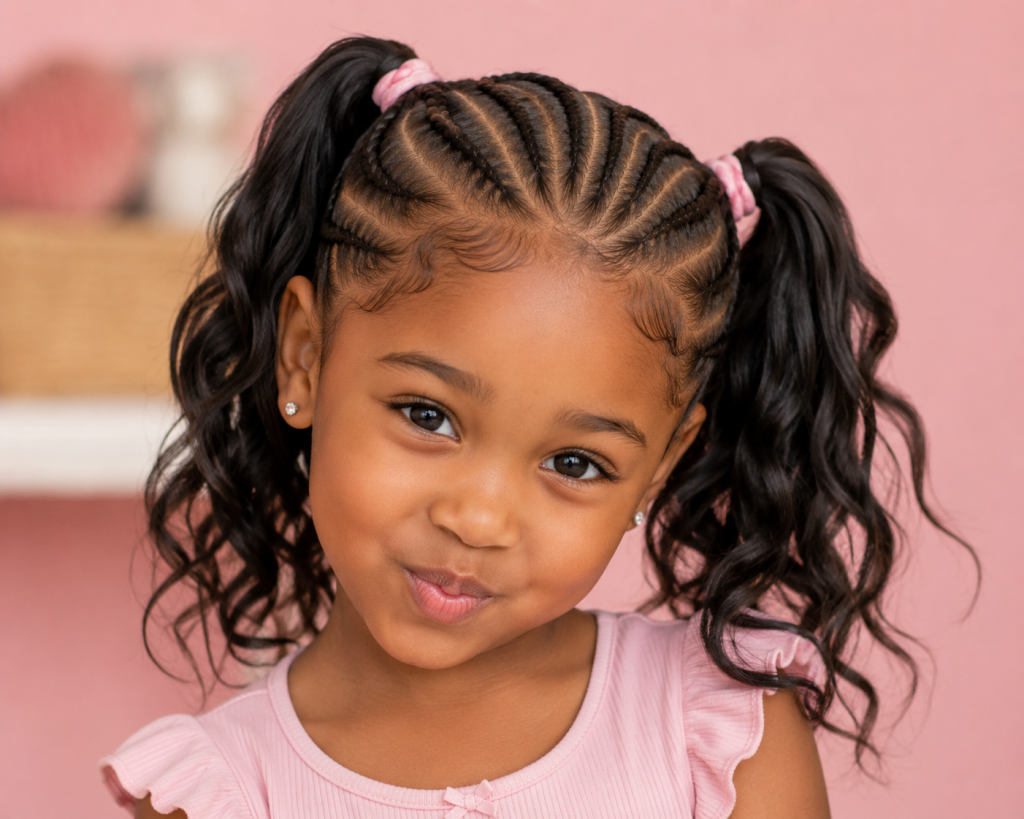
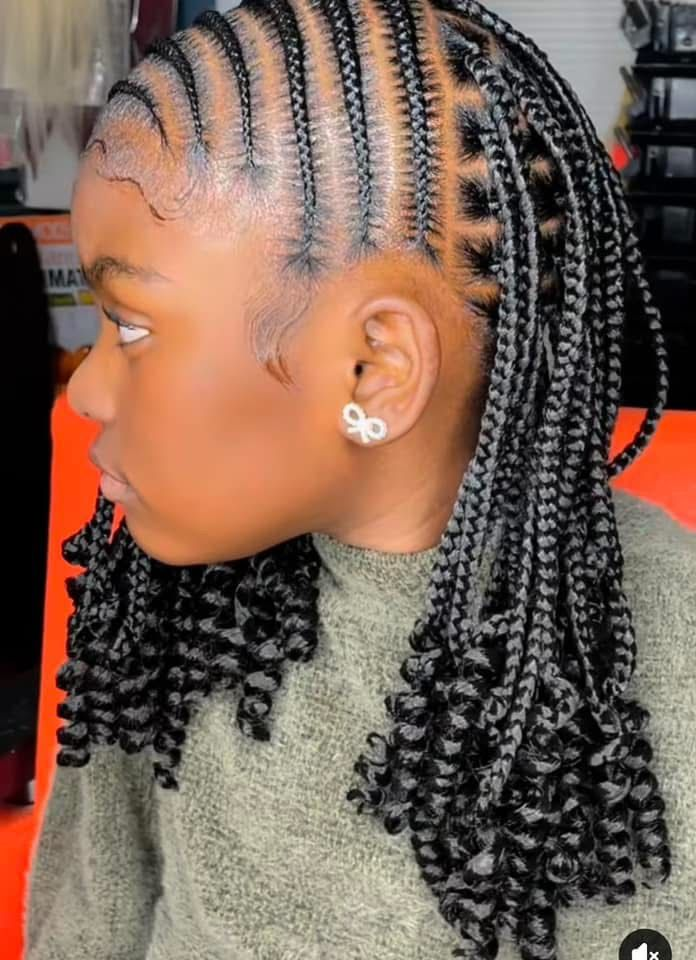
5. Lemonade Braids (Side-Swept)
Popularized by Beyoncé but perfectly scaled for kids. The hair is deeply side-parted (at the eyebrow arch) and braided diagonally across the head toward the opposite ear. Each row begins with a feed-in technique where small extensions are gradually added every three stitches. For children under eight, limit feed-ins to the first inch only to keep weight off the roots. The result is a sleek, asymmetrical look that keeps hair off the neck—ideal for hot weather. Maintain by tying a silk scarf around the edges each night, as the side-swept angle puts extra friction on the nape hairs during sleep. Lasts 10–14 days.
6. Cornrow Bun for Kids
A formal event favorite that transitions to everyday wear. Cornrows sweep from the hairline toward a central point at the crown, where all ends gather into a single bun. Use five to seven braids for a polished look or three chunky braids for a casual feel. The bun should be secured with a satin scrunchie rather than rubber bands, which snap delicate ends. This style excels for dance recitals and school pictures because nothing falls into the face. For young children with tender scalps, stop the cornrows two inches before the crown and braid the remaining loose hair into the bun—this creates a buffer zone of less tension. Refresh the bun weekly by taking it down, detangling, and re-forming.
7. Stitch Cornrows (Invisible Part)
Also called “invisible cornrows” because the parts disappear when braided tightly. Use the tip of a rattail comb to lift a thin slice of hair from each part, braiding it into the adjacent row. This technique creates a “stitched” appearance along the scalp that looks incredibly neat. The main advantage for kids is longevity—stitch braids hold twice as long as standard cornrows because the interlocking prevents slippage. However, they take longer to install (two hours minimum) and should only be done on well-moisturized, detangled hair. Not recommended for children under five or those who cry during braiding, as the tension is more intense. Use a leave-in conditioner spray daily to keep the scalp visible through the parts.
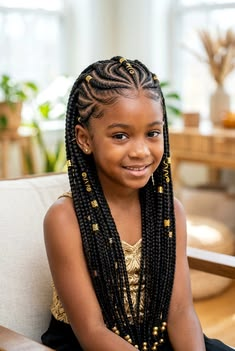
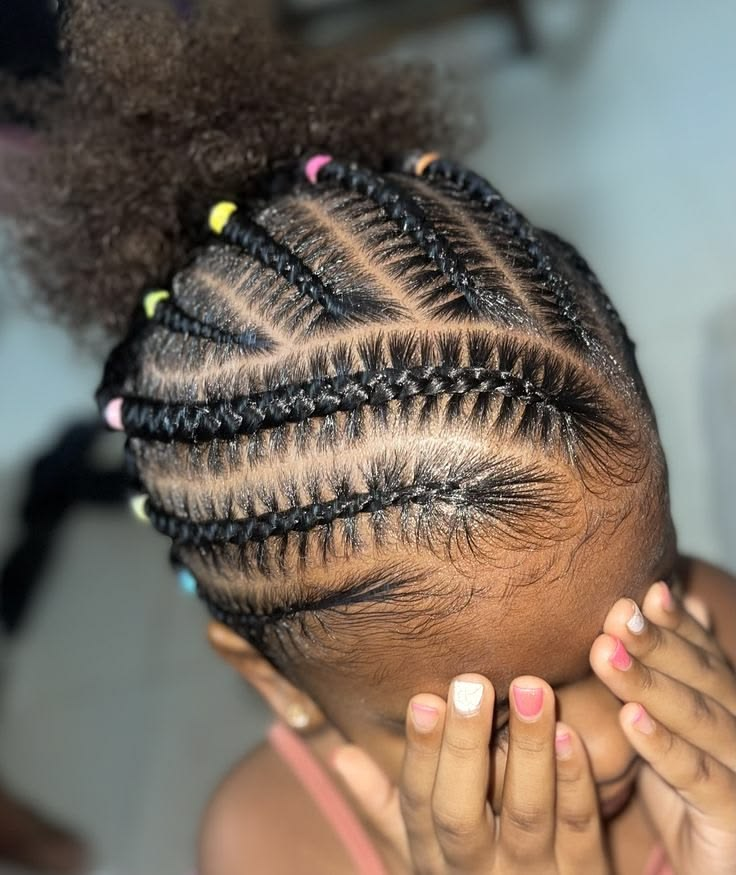
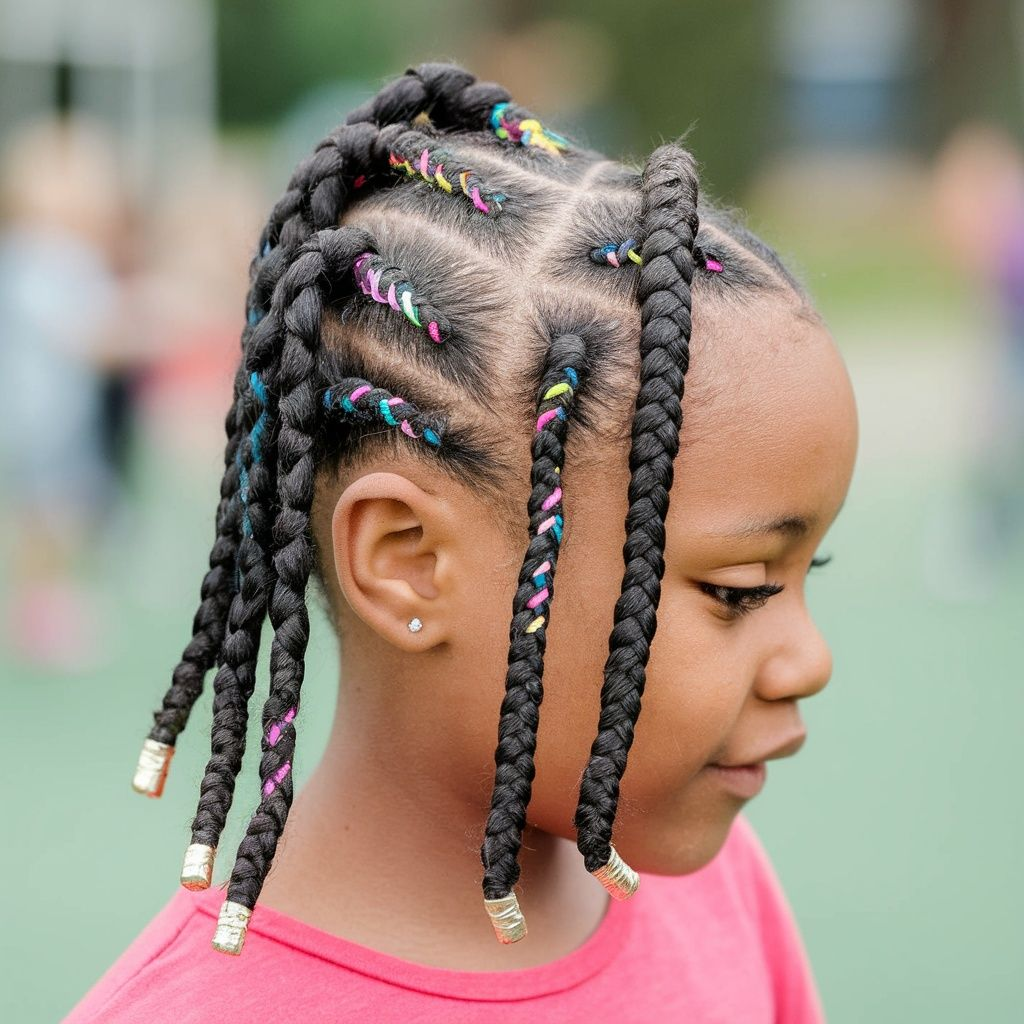
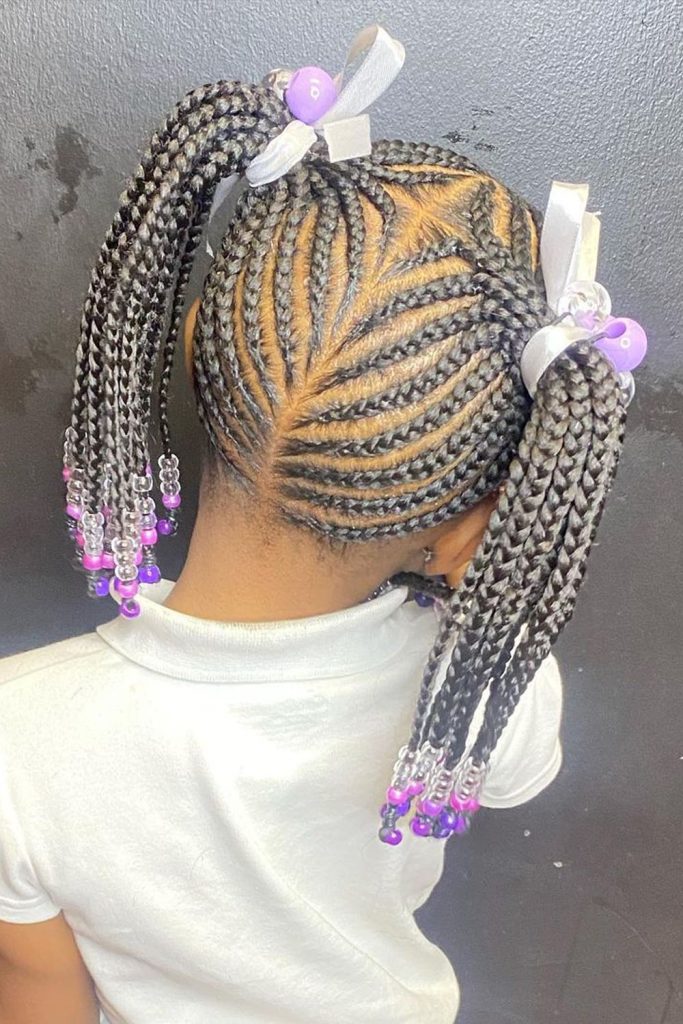
8. Ghana Braids with Beads
These raised, rope-like cornrows stand off the scalp rather than lying flat. Achieved by feeding in extension hair at every single stitch (versus every few stitches in standard feed-ins). The result is thicker, more defined rows that hold beads beautifully. For kids, limit bead placement to the last three inches of each braid only—full-length beads add significant weight that pulls at the roots. Choose plastic or silicone beads over metal, which heats up in sunlight. Ghana braids excel for swimming because the raised structure allows chlorine to rinse out completely. However, they require more drying time afterward. Use a microfiber towel to gently squeeze excess water from each braid after pool time.
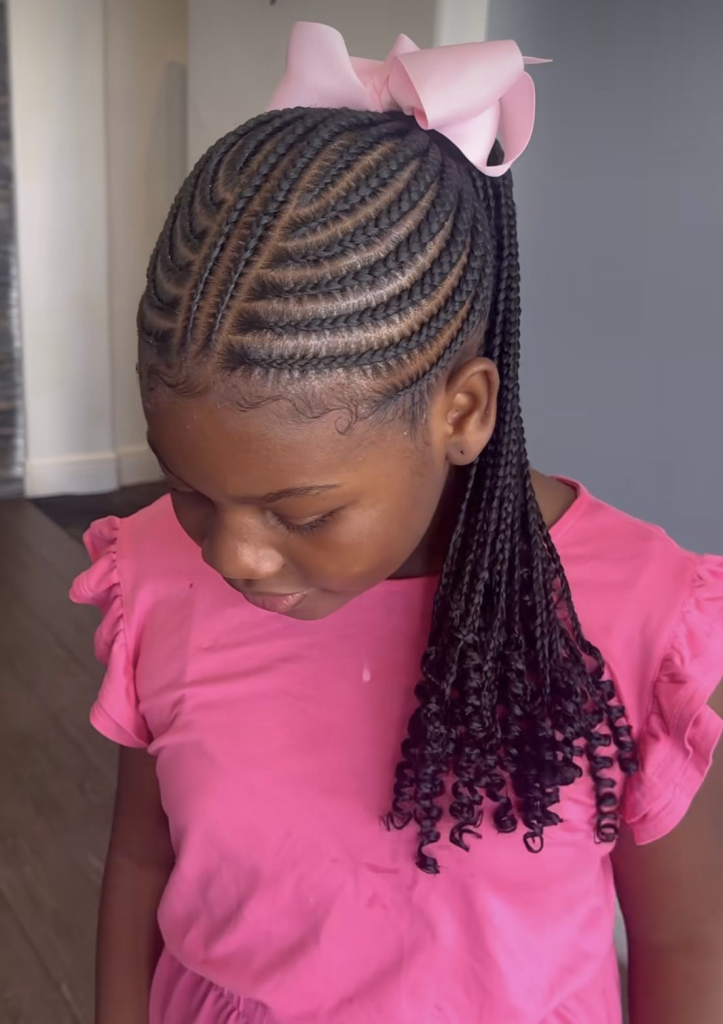
9. Cornrow Ponytail with Curly Ends
Combine protective styling with playful texture. Cornrows cover the entire scalp in any pattern (straight-back works best), but each braid ends just below the ear. The remaining loose hair is gathered into a single ponytail and either curled with flexi-rods or left in its natural texture. This style protects 80% of the hair shaft while leaving ends accessible for moisturizing. For children with type 4 hair, stretch the ponytail ends gently before curling to prevent single-strand knots. The real time-saver: ponytails last longer than fully braided ends because they’re easier to re-moisturize without frizzing the cornrows. Apply mousse to the ponytail only, not the braids, every morning.
10. Cornrow Mohawk for Kids
Bold but practical for very active boys and girls. Cornrows run from forehead to crown only along the center of the head (about two inches wide), while the sides are either shaved or tapered short. For parents who prefer not to shave, simply leave the sides in a short wash-and-go. This dramatically reduces total braiding time to 30 minutes because only the center strip requires styling. The mohawk works best on kids with medium-to-thick density—fine hair may not have enough volume to create the “ridge” effect. Maintain by trimming the sides every three weeks if shaved, or refreshing with curl cream weekly if left natural. The open sides also mean less product buildup, reducing scalp irritation.
11. Crochet Cornrows for Fine Hair
A game-changer for children with naturally thin or damaged hair. Instead of braiding their real hair, you create a few loose cornrows (the “foundation”) and then loop pre-braided crochet hair through using a latch hook. This puts virtually zero tension on fine strands because their hair never carries the weight of extensions. For kids recovering from traction alopecia, crochet cornrows allow healing while still achieving a braided look. Installation requires learning the latch hook technique (15-minute learning curve) but saves hours compared to individual feed-ins. The crochet hair can be reused twice if cared for properly. Style lasts 7–10 days maximum—longer than that risks tangling at the roots in fine hair.
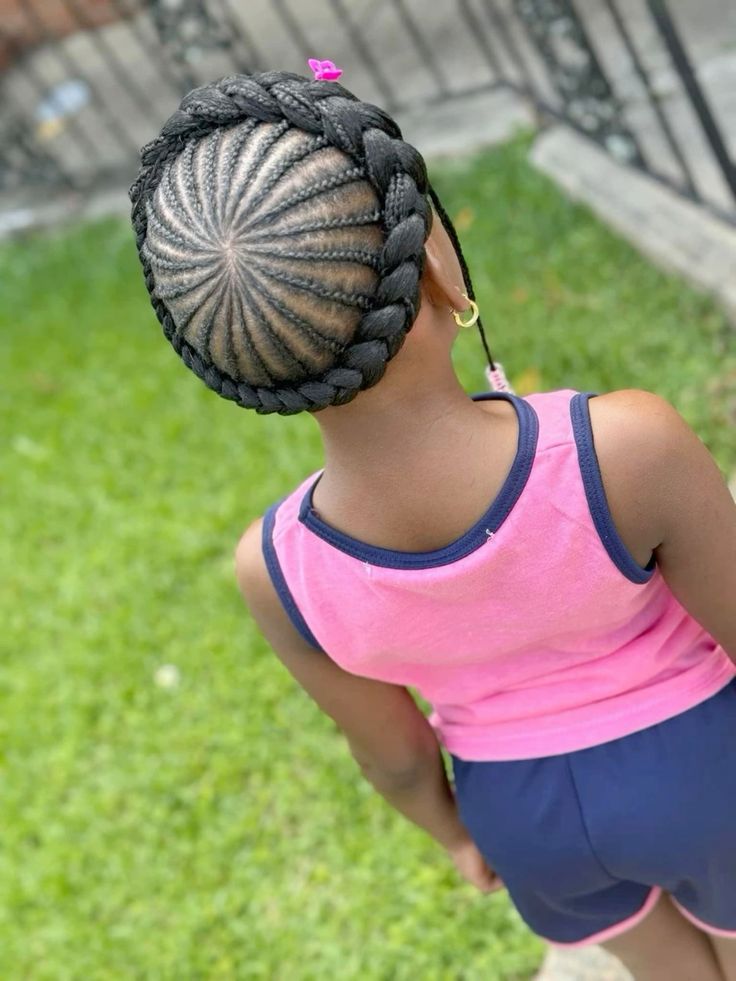
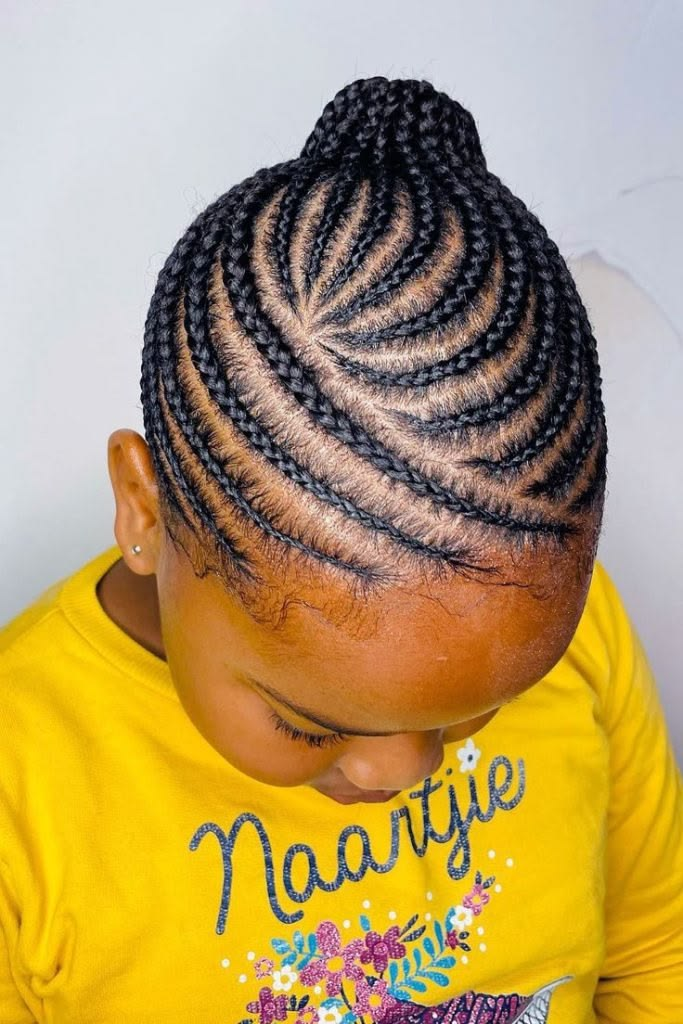
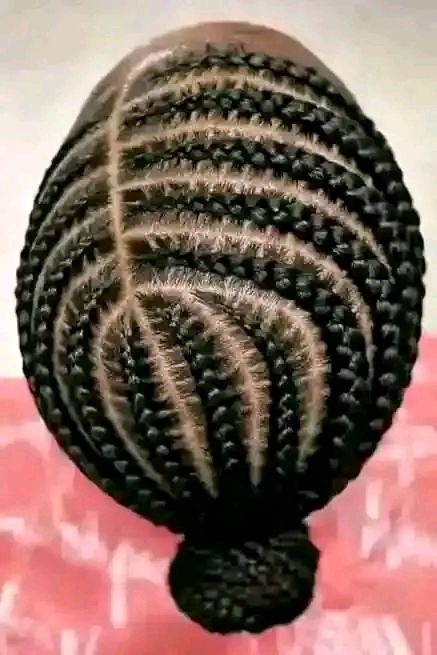
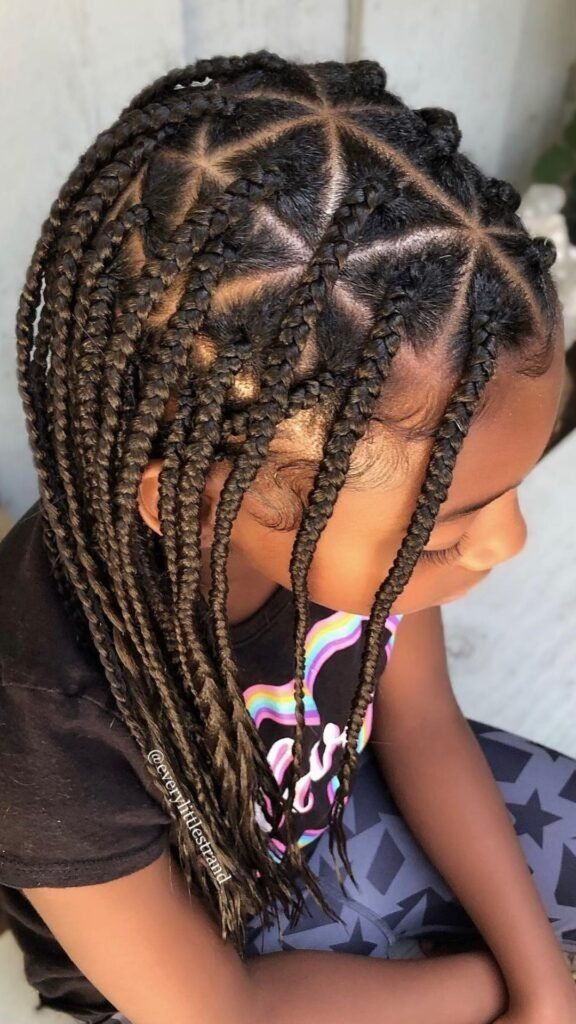
12. Cornrow Crown (Circle Style)
A princess-approved style where cornrows radiate outward from a center point like bicycle spokes, then circle the head’s perimeter. Start at the crown (the highest point of the skull) with a small circular braid, then work outward in rings. This style eliminates all part lines, which means no visible new growth for weeks. It’s the longest-lasting cornrow style for kids who hate frequent re-braiding, often stretching to four weeks with proper care. The downside is installation difficulty—mapping concentric circles on a moving child requires patience. Use a spray bottle with diluted conditioner to keep sections damp. At night, cover with a mesh wig cap to prevent individual braids from separating.
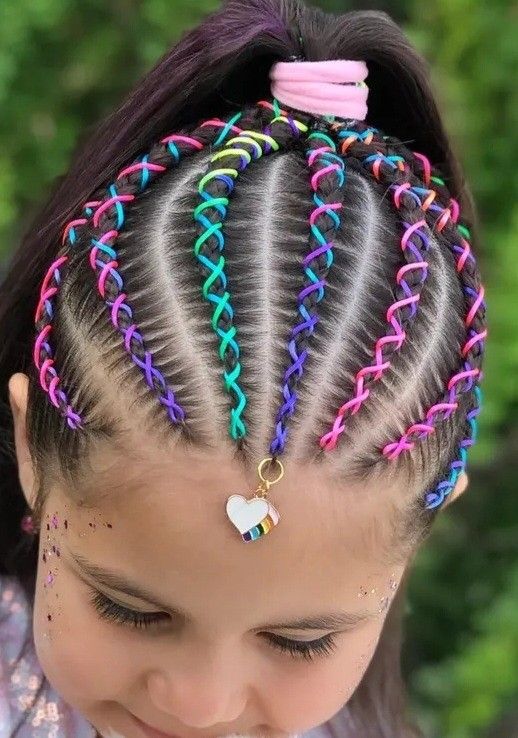
13. Jumbo Cornrows with Color Thread
Perfect for kids who want “fun hair” without chemical color or synthetic extensions that cause itching. Braid only six to eight very thick cornrows (each about an inch wide), then wrap colorful cotton embroidery thread around every other braid. The thread adds zero weight and comes in hundreds of colors, including glow-in-the-dark and metallic options. To secure thread ends without glue, tuck the final inch under the previous wrapped section using a needle. Jumbo braids install quickly (40 minutes) but don’t last as long as smaller ones—expect 7–10 days before frizz appears. The thicker sections also dry faster after washing, reducing mildew risk. Change thread colors monthly for a fresh look without re-braiding.
14. Fishbone Cornrows
An intricate pattern where two smaller cornrows twist around each other to form a single, braided “bone.” On children’s heads, fishbones work best as accent strips (two or three rows) rather than full-head styles. For example, create a fishbone down each side of a mohawk, or one vertical fishbone down the center with straight backs on either side. The effect is stunning but requires advanced parting skills—each section must be exactly symmetrical. The tension is actually lower than standard cornrows because the twisting distributes stress across more points. Fishbones last three weeks easily because the interlocking prevents loosening. Refresh the scalp with a dropper bottle of diluted tea tree oil to reach between the tight twists.
15. Curved Cornrows (Half-Circles)
Arcs that follow the natural curve of the skull, usually starting at one temple and ending at the opposite nape. Unlike straight backs that run front-to-back, curved cornrows flow across the head horizontally or diagonally. This style flatters children with prominent foreheads or uneven hairlines because the curves soften features. The technique requires consistent tension around each arc—too loose and the curve loses shape, too tight and the hair pulls at the turn points. Install in three wide curves for a modern look or eight narrow curves for traditional styling. For maintenance, focus moisturizer only on the ends; product on the curved sections can weigh them down and straighten the arcs.
16. Braided Space Buns
Combines two kid favorites: cornrows and buns. The front half of the head is braided into four to six cornrows that end at the crown. From there, the remaining hair is divided into two sections (left and right), each twisted into a bun over the ears. This keeps all hair off the neck and face simultaneously. For children with very long hair, the space buns can be quite large—flatten them into “donut” shapes using bobby pins for a sleeker look. The cornrowed front section protects the delicate hairline while the buns offer easy access for re-moisturizing ends. Re-twist the buns every three days to prevent matting. Great for dance class and gymnastics where low-profile styles are required.
17. Cornrow Triangle Parts
A geometric twist on standard cornrows where part lines form interlocking triangles instead of straight rows. Each triangle is filled with a short cornrow that follows the shape’s internal angles, creating a mosaic pattern across the scalp. This style works best with an undercut (shaved sides) so the triangles pop visually. For kids without undercuts, limit triangles to the crown area only as a focal point. Installation requires mapping the entire head first—use a protractor comb or measure with your fingers. The triangles actually reduce total scalp tension because each braid is shorter than a full-row style. However, loose ends at each triangle tip require sealing with a knot or bead to prevent unraveling.
18. Cornrows with Ribbon Weave
For formal occasions or everyday flair, satin ribbon woven through cornrows adds elegance without beads getting caught in car seats or school desks. After braiding standard cornrows (any pattern), thread a plastic yarn needle with ¼-inch satin ribbon and weave it over-and-under each braid. The ribbon should be twice the length of the braid to allow for weaving. Unlike elastic bands that cause breakage, ribbon applies zero tension and can be removed and re-woven daily to match outfits. For school dress codes that prohibit “distracting” hair accessories, use ribbon in the child’s uniform color (navy, white, or red). The ribbon also protects braids from absorbing chlorine during swimming. Change ribbon weekly without re-braiding.
Why Choose Cornrows for Kids?
Cornrows offer unique advantages over other protective styles for children. Unlike loose hairstyles that tangle overnight or individual braids that take six hours to install, cornrows keep the entire hair shaft neatly secured against the scalp. This prevents the two biggest sources of child hair damage: friction from pillowcases and matting at the nape from coat collars.
For parents managing natural hair, cornrows significantly reduce detangling sessions. A child with loose type 4 hair may require 30 minutes of detangling daily, while cornrowed hair needs only a five-minute moisture refresh each morning. Over a two-week period, that’s nearly six hours of saved time.
Cornrows also promote hair growth by eliminating daily manipulation. The less you comb, brush, and style, the less breakage occurs at the delicate ends. Many parents report seeing noticeable length retention after just three months of consistent cornrow rotation.
Additionally, cornrows build confidence in young children. A neat, creative braided style often reduces teasing compared to “messy” natural styles in schools where textured hair is less understood. And when your child can wake up and go without a 20-minute styling battle, everyone starts the day happier.
How to Prepare Your Child’s Hair Before Braiding
Proper preparation determines whether cornrows last two weeks or two days. Start three days before braiding with a clarifying wash to remove product buildup. Use a sulfate-free shampoo followed by a deep conditioner with slip (slippery elm or marshmallow root are excellent natural options). Rinse thoroughly but leave 20% of the conditioner in.
Next, detangle in sections. Divide damp hair into four quadrants. Apply a leave-in conditioner and a detangling brush like the Tangle Teezer, working from ends to roots. For severe tangles, pre-treat with apple cider vinegar diluted 1:3 with water to close the cuticle and reduce friction.
Stretch the hair before braiding to prevent shrinkage that causes tension at the roots. The easiest method: band the hair into 8–10 loose ponytails with satin scrunchies and allow to air dry completely overnight. Alternatively, blow dry on cool using a comb attachment, but never on high heat for children’s fine strands.
On braiding day, create a comfortable setup. Place a small pillow behind your child’s neck and play a tablet show at eye level. Have a spray bottle with diluted aloe vera juice (no alcohol) to keep sections damp. Part with a metal rattail comb—plastic combs snag fine hair.
Finally, apply a light holding product. For normal to thick hair, use a botanical gel like Uncle Funky’s Daughter. For fine or damaged hair, skip gel entirely and use only foam mousse. Never use rubber bands at the roots; they cause the most damage. Use a small amount of edge control only on the hairline, not throughout.
How to Maintain Kids Cornrow Hairstyles
Nightly maintenance is non-negotiable for cornrow longevity. Your child must sleep on a satin or silk pillowcase. Even better: a satin bonnet or scarf. If your child removes head coverings during sleep, try a satin-lined sleeping cap with an elastic chin strap designed for kids.
Morning refresh takes two minutes. Lightly mist braids with a spray bottle containing water, aloe vera juice, and five drops of rosemary essential oil. Avoid spraying the scalp directly if your child has sensitive skin. Smooth any flyaways with a soft toothbrush dipped in a tiny amount of aloe gel.
Scalp care happens every third day. Use a dropper bottle to apply jojoba or grapeseed oil directly to the parts—these oils mimic the scalp’s natural sebum without clogging pores. Massage gently with fingertips, not nails. If you see white buildup, clean parts with witch hazel on a cotton swab.
Wash cornrows only when necessary. For most kids, once during the two-week style is sufficient. Use a diluted shampoo in a squeeze bottle applied directly to the parts, not rubbed over the braids. Rinse thoroughly but quickly to avoid frizz. Allow to air dry completely—never put a child to bed with damp cornrows as this causes mildew and odor.
Re-braid edges every 5–7 days. The hairline and nape experience the most friction and will loosen first. You don’t need to redo the whole head; just re-braid the first inch of any loose rows and secure with a small elastic (cut the elastic out rather than pulling it off to prevent breakage).
Common Mistakes Parents Should Avoid
Braiding too tightly is the number one cause of traction alopecia in children. Signs your child’s braids are too tight: small bumps (folliculitis) at the hairline, complaints of headache or “pulling” sensation, or redness that persists an hour after braiding. The correct tension allows you to gently lift a braid away from the scalp—if it lies completely flat with no give, it’s too tight.
Using rubber bands at the roots creates concentrated tension that snaps fine hairs. Substitute with small silicone elastics designed for natural hair, and always cut them out rather than pulling. Better yet, finish braids by tucking the ends under the previous stitch (a technique called “tying off”) which requires no elastic at all.
Skipping the stretch phase leads to shrinkage that pulls braids upward, increasing tension throughout the week. Always stretch before braiding, even if your child has heat-trained or relaxed hair. Unstretched hair shrinks back within 48 hours, causing previously comfortable braids to become painful.
Letting cornrows stay in too long causes matting and loc-ing. For children under 10, two weeks is the maximum. After 14 days, shed hairs accumulate at the roots and begin knotting around the braid. Removing matted cornrows requires cutting, which damages length.
Ignoring scalp complaints is the most dangerous mistake. Children often don’t articulate pain clearly—they may simply become fussy during braiding or touch their head repeatedly. If your child resists braiding more than usual, stop and assess. The style isn’t worth permanent hair loss.
Best Accessories for Kids Cornrow Hairstyles
Silicone beads (not plastic) are safest for young children. They’re flexible, won’t crack into sharp pieces, and come in easy-open designs. Avoid metal beads that heat up in sun and wooden beads that absorb moisture and mildew.
Pre-cut satin scrunchies in small sizes protect ends when cornrows transition into ponytails or buns. The wide satin surface reduces friction compared to standard elastic bands. Keep a pack of 30 in your bathroom drawer.
Edge control with aloe not petroleum jelly. Most drugstore edge controls contain mineral oil that builds up on young scalps. Look for water-based formulas with aloe vera as the first ingredient. Apply only with a clean toothbrush, never with fingers.
Spray bottle with continuous mist prevents over-wetting. Standard spray bottles release uneven droplets that soak sections; continuous mist bottles distribute a fine even layer. Fill with water and vegetable glycerin (one tablespoon per cup) for humidity resistance.
Silk pillowcases in fun prints increase the chance your child will actually use them. Let them pick their own pattern—unicorns, dinosaurs, or space themes. Have two in rotation so one is always clean.
Frequently Asked Questions
How long can kids keep cornrows in?
Maximum two weeks for children under 12. Younger children (under 6) should not exceed 10 days because their hair grows faster relative to their head size, causing tension sooner. Between 12–14 days, remove the style even if it still looks neat.
Are cornrows painful for kids?
Properly installed cornrows should cause zero pain. Mild discomfort during the first hour is normal as the scalp adjusts. Sharp pain, headaches, or burning sensations indicate excessive tension. If your child complains of pain while you’re braiding, stop immediately.
Can kids swim with cornrows?
Yes, but with precautions. Rinse hair with fresh water before entering chlorinated or salt water—dry hair absorbs more chemicals. After swimming, rinse again and apply leave-in conditioner. Never let a child sleep in wet cornrows; mildew develops within hours.
How often should I wash cornrowed hair?
Once during the two-week style is sufficient for most kids. Use a shampoo bottle with a pointed tip to apply directly to the parts. More frequent washing causes frizz and shortens the style’s life.
At what age can a child get cornrows?
Hair texture matters more than age. Once a child has enough length to grip between your fingers (typically 2–3 inches, around 18 months for most toddlers), cornrows are possible. However, wait until age 3 for feed-in or extension styles, as the added weight can strain immature follicles.
How much do kids’ cornrows cost professionally?
$60–$150 depending on complexity and location. Simple straight-backs for a child under 8 average $65. Heart patterns or stitch cornrows run $100–$150. Many salons offer “child rates” that are 20–30% lower than adult prices.
Can cornrows damage edges?
Yes, if installed or maintained incorrectly. To protect edges: never braid hair that is wet (it shrinks and tightens), always start braids ⅛ inch away from the actual hairline rather than on it, and never apply glue or heavy gels to the perimeter.
Stronger Conclusion with Call to Action
Cornrows are more than a hairstyle—they’re a tool for stress-free mornings, healthy hair retention, and creative expression for your child. The 18 styles outlined here offer options for every skill level, from beginner-friendly straight-backs to advanced heart patterns and Ghana braids. What matters most isn’t perfection, but consistency with preparation and maintenance.
Start small. Choose one style from this list—perhaps the classic straight-backs or the cornrow ponytail with curly ends—and practice on a weekend when you’re not rushed. Take photos of each section before you begin so you can replicate your parting pattern. And remember: if your child resists or complains of pain, listen. No style is worth their comfort.
Now it’s your turn. Which of these 18 cornrow styles will you try first? Save this article to your “Kids Hair” Pinterest board, share it with another parent who struggles with morning hair battles, or leave a comment below with your child’s favorite braided style. For weekly natural hair tips delivered to your inbox, join our newsletter using the form in the sidebar. Your easiest school mornings start with the right protective style.
Leave a Reply